Imagine a typical situation – yesterday your devops engineer was eaten by a tiger. You a very sad because he didn’t finish the release system for your project. It contains 4 repositories: 2 back-end, 1 front-end, 1 data pipeline.
And now it is you who should set up a deploy pipeline for your project tomorrow.
In this article you’ll get to know how to set up Jenkins, Ansible and Catcher to build multi-environment production ready CI/CD with E2E tests and minimum effort.
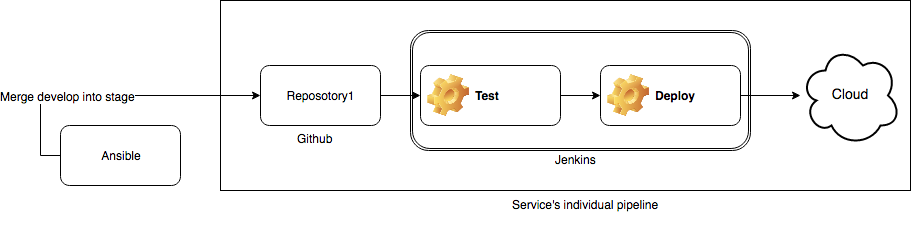
Individual pipeline
First step to do – is to set up an individual pipeline for every service. I assume that you are a good developer and you have a separate git repository for each service.
All you need to do here – is to write a Jenkins pipeline and fed it to Jenkins via organization plugin, manually or automatically. The pipeline will be triggered on every commit. It will run tests for every branch. In case of environment branch (develop, stage or master) it will also build docker image and will deploy it to the right environment.

Set up an agent
Agent is the starting point of every Jenkins pipeline. The most common is agent any, unless you don’t need any special stuff.
Set up triggers
Your pipeline should be triggered on every commit. If your Jenkins is not accessible from external network – use pollSCM.
Set up environment variables
They make your life much easier, as they allow you to copy-paste your Jenkinsfile with minimum changes.
Environment should include the docker image names.
environment {

    IMAGE_NAME = "<your_docker_registry_url:port>/<your_project>:${env.BUILD_NUMBER}-${env.BRANCH_NAME}"
    LATEST_IMAGE_NAME = "<your_docker_registry_url:port>/<your_project>:latest-${env.BRANCH_NAME}"

}
Set up common steps
Common steps are steps, that should be called on every branch. Even if it is a feature branch.
steps {

        sh "make test"

    }
Remember, that keeping to a standard is a wise decision (or you will be eaten by a tiger too). So, ensure you have a Makefile in your repository. It is your friend here, as it allows you to build language agnostic pipeline. Even if your new devops don’t know your programming language or build system, they will understand, that calling `make test` will test your project.
It is also the right place for notifications. Use slackSend to send a notification to your project’s Slack channel.
slackSend color: "warning", message: "Started: ${env.JOB_NAME} - ${env.BUILD_NUMBER} (<${env.BUILD_URL}|Open>)"
Set up special build steps
Special steps are the steps, that should be run only when changes are made to a special branch. Jenkins allows you to use a when condition:
stage('Build') {

   when {

     expression {

        return env.BRANCH_NAME == 'master' || env.BRANCH_NAME == 'develop' || env.BRANCH_NAME == 'stage'

     }

   }
   steps {
      sh "docker build -t ${env.IMAGE_NAME} ."
      sh "docker push ${env.IMAGE_NAME}"

      sh "docker tag ${env.IMAGE_NAME}
  ${env.LATEST_IMAGE_NAME}"

      sh "docker push ${env.LATEST_IMAGE_NAME}"
   }
}
Set up environment-specific deploy
Besides the when condition, you should also select the proper image or configuration to deploy the right environment. I use Marathon and my dev/stage/prod use different CPU limitations, secrets and other configurations. They are stored in marathon/marathon_<env>.json. So before the deploy you should select the proper configuration file. Use script for this:
stage('Deploy_api'){

  when {

    expression {

       return env.BRANCH_NAME == 'master' || env.BRANCH_NAME == 'develop' || env.BRANCH_NAME == 'stage'

    }

  }

  steps {

    script {

        if (env.BRANCH_NAME == 'master') {

            env.MARATHON = "marathon/marathon_prod.json"

        } else if (env.BRANCH_NAME == 'stage') {

            env.MARATHON = "marathon/marathon_stage.json"

        } else {

            env.MARATHON = "marathon/marathon_dev.json"

        }

    }

    marathon(

      url: 'http://leader.mesos:8080',

      docker: "${env.IMAGE_NAME}",

      filename: "${env.MARATHON}"

    )

  }

}
Ansible promote role
The easiest way to set up a promotion from one environment to another is to trigger the individual pipeline, configured previously.
In the previous article I showed you, that it is much better to use Jenkins together with Ansible. There are no exceptions here (just imagine, that tiger also ate your Jenkins-machine).
We will use a python script wrapped in the Ansible role. For those who haven’t read my previous article – groovy jenknis shared library can be used instead, but it is not recommended as:
- it is difficult to develop and debug such libraries, because of different versions of Jenkins, Jenkins groovy plugin and groovy installed locally.
- it makes your release highly depend on your Jenkins, which is OK until you decide to move to another CI, or your Jenkins is down and you need to do a release.
Python script
To trigger the promotion from develop to stage you should merge develop into the stage and push it. That’s all. After the push it’s internal pipeline will be triggered.
The python script itself:
- Clone the repository
- Checkout to the branch you are going to promote
- Merge the previous environment’s branch
- Push it!
That looks very easy, although here are some tips.
Prefer your system’s git to the python’s library. In this case you can use your own keys while running locally.
def call_with_output(cmd: str, directory='.'):

    output = subprocess.Popen(cmd.split(' '),

                              stdout=subprocess.PIPE,

                              stderr=subprocess.STDOUT,

                              cwd=directory)

    stdout, stderr = output.communicate()

    if stderr is None:

        return stdout

    raise Exception(stderr)
If your repository is not public, you should clone it by token. Notice, that git_user, git_token and company are ansible variables. They don’t change too often, so I store them in role’s default variables.
call_with_output(f'git clone https://{{ git_user }}:{{ git_token }}@github.com/{{ company }}/{ repo }.git')
It is good not to call push if there are no changes. But not all git versions have the same output. up-to-date differs from up to date. It took me a while to notice this.
changes = call_with_output(f"git merge { from_branch }", repo).decode("utf-8").strip()
if changes != "Already up to date." and changes != "Already up-to-date.":

    call_with_output(f"git push origin HEAD:{ to_branch }", repo)
Sending a slack notification directly to your project’s channel is also a good idea. You can do it via slack webhook.
def notify_slack(callback, message):

    response = requests.post(callback, data=json.dumps({'text': message}),

                             headers={'Content-Type': 'application/json'}

                             )

    if response.status_code != 200:

        raise ValueError('Request to slack returned an error %s, the response is:\n%s'

                         % (response.status_code, response.text)

                         )
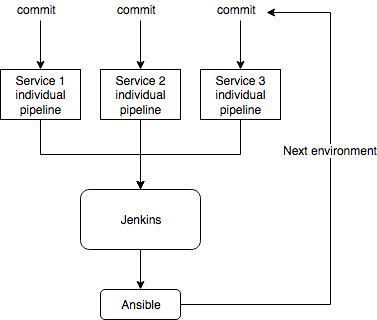
Jenkins shared pipeline
Now you have your Ansible promote role. It’s time to create a Jenkins pipeline for the whole project, which will call Ansible for you. This pipeline can be triggered manually by you or automatically by any of the project’s services.
Start with adding a parameter:
parameters {
    choice(choices: 'develop\nstage\nmaster', description: 'Which environment should I check?', name: 'environment')
}
The deploy step:
stage('Promote dev to stage') {
    when {
        expression {
            return params.environment == 'develop'
        }
    }
    steps {
        deploy_all('develop', 'stage')
    }

}
Where deploy_all downloads your ansible repository with the role you’ve created and calls it for every service of project being deployed.
def deploy_all(from, to) {
    git branch: 'master',
        credentialsId: “${env.GIT_USER_ID}”,
        url: "https://github.com/<your_company>/<your_ansible_repo>"
    deploy('repo_1', from, to)
    deploy('repo_2', from, to)
    deploy('repo_3', from, to)
}


def deploy(repo, from, to) {
    ansiblePlaybook(
        playbook: "${env.PLAYBOOK_ROOT}/deploy_service.yaml",
        inventory: "inventories/dev/hosts.ini",
        credentialsId: ${env.SSH_USER_ID},
        extras: '-e "to=' + "${to}" + ' from=' +"${from}" + ' repo=' + "${repo}" + ' slack=' + "${env.SLACK_CALLBACK}" + '" -vvv')
}
Now you have the deploy pipeline for all services and can call it manually. It is 3x faster, than calling manually the pipeline of each of 3 projects. But it is not our goal yet.
We need this pipeline to be triggered by any of our internal pipelines.
Add this step to all 3 Jenkinsfiles of your services:
stage('Trigger promotion pipeline) {
 when {
    expression {
         return env.BRANCH_NAME == 'master' || env.BRANCH_NAME == 'develop' || env.BRANCH_NAME == 'stage'
    }
 }
 steps {
   build job: "../<jenkins_promote_project_pipeline_name>/master",
         wait: false,
         parameters: [
           string(name: 'environment', value: String.valueOf(env.BRANCH_NAME))
         ]
 }
}
Automation part is done now. After you’ve merged your feature branch local service’s tests are run and service is deployed to develop environment. After it the pipeline immediately triggers promotion pipeline for the whole project. All services which were changed will be deployed to the next environment.
Add end-to-end test
Automatic promotions is good, but what is the point of it? It just moves your changes from environment to environment without any high-level acceptance tests?
In Catcher’s article I’ve already mentioned, that green service’s tests don’t give you dead certainty that your services can interact with each other normally. To ensure, that the whole system is working you need to add end-to-end tests in your promotion pipeline.
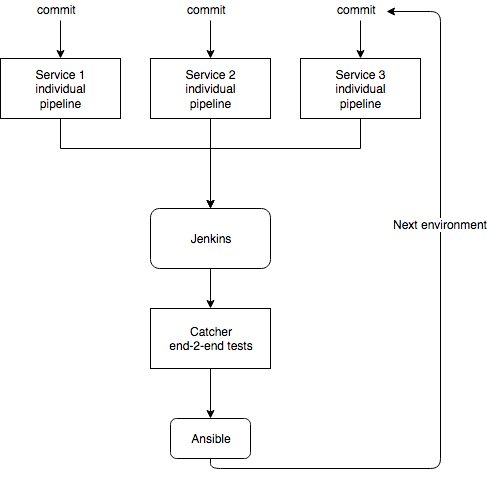
To add Catcher end to end tests just create inventory and tests in your Jenkins shared pipeline’s repository project (I assume that you have separate git repository, where you store the pipeline, readme with deployment description, etc).
In the inventory you should mention all project’s services, for every environment. F.e. for develop:
backend1: "http://service1.dev:8000"
frontend: "http://service2.dev:8080"
backend2: "http://service3.dev:9000"
database: "http://service4.dev:5432"
In tests you should put your end-to-end tests. The simpliest thing will be checking their healthchecks. It will show you that they are at least working.
---
steps:
  - http:
      name: 'Check frontend is up'
      get:
        url: '{{ backend1 }}'
  - http:
      name: 'Check backend1 is up'
      post:
        url: '{{ backend1 }}/graphql'
        body: '''
        {
           __schema {
              types {
                name
              }
           }
        }'''
        headers:
          Content-Type: "application/graphql"
  - http:
      name: 'Check backend2 is up'
      get:
        url: '{{ backend2 }}/healthcheck'
  - postgres:
      conf: '{{ database }}'
      query: 'select 1'
Add test step to your jenkins pipeline just before the deploy.
Do not forget to create a Makefile.
stage('Prepare') {
     steps {
       sh "make conda"
       sh "make requirements"
     }
    }
Make sure you’ve selected the proper environment. You should always test the same environment, which is specified in patameter.environment.
stage('Test') {
     steps {
        script {
            if (params.environment == 'develop') {
                env.INVENTORY = "dev.yml"
            } else {
                env.INVENTORY = "stage.yml"
            }
        }
        sh "make test INVENTORY=${env.INVENTORY}"
     }
    }
Piece of the Makefile:
CONDA_ENV_NAME ?= my_e2e_env
ACTIVATE_ENV = source activate ./$(CONDA_ENV_NAME)

.PHONY: conda
conda: $(CONDA_ENV_NAME)
$(CONDA_ENV_NAME):
	conda create -p $(CONDA_ENV_NAME) --copy -y python=$(PY_VERSION)
	$(ACTIVATE_ENV) && python -s -m pip install -r requirements.txt

.PHONY: requirements
requirements:
	$(ACTIVATE_ENV) && python -s -m pip install -r requirements.txt

.PHONY: test
test:
	$(ACTIVATE_ENV) && catcher script/tests -i inventory/${INVENTORY}
Disable automatic prod promotion
End-to-end test is good, but not perfect. You shouldn’t let every change deploy on prod realtime. Unless you like to work at night.
Add an input for promote stage to master pipeline’s step. If nobody will press this input – it will be ignored.
stage('Promote stage to prod') {
     when {
        expression {
             return params.environment == 'stage'
        }
     }
     steps {
        script {
          def userInput = false
          try {
            timeout(time: 60, unit: 'SECONDS') {
                userInput = input(id: 'userInput',
                                  message: 'Promote current stage to prod?',
                                  parameters: [
                                      [$class: 'BooleanParameterDefinition', defaultValue: false, description: '', name: 'Promote']
                                  ])
            }
          } catch(err) {

          }
          if (userInput) {
            print('Deploying prod')
            deploy_all('stage', 'master')
          } else {
            print('Skip deploy')
          }
        }
     }
    }
In this case prod will be deployed only after stage’s e2e test is successfull and user decides changes are ready to be promoted.
Conclusion
Such pipeline allows you to deploy a bunch of microservices at once with minimal changes to an existing infrastructure, as we re-use each service’s internal deploy pipeline, which you probably already have.
It is not perfect, as it doesn’t take into a consideration broken build or red service-level tests. But it allows you to save your time during the deploy and remove human error factor by setting all dependent services at one place.
In my next article I’ll show you the example of a rollback pipeline for a set of microservices.