Today Catcher’s external modules 5.1.0 were finally released. Great news, everyone, as it adds a Selenium step for Frontend testing!
What should a proper e2e test look like?
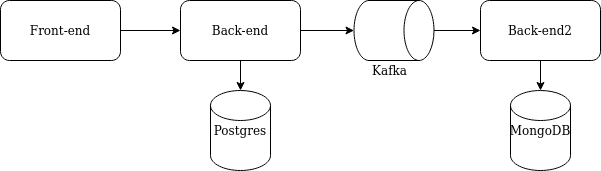
Imagine you have a user service with a nice UI, which allows you to get information about users, registered in your system. Deeply in the backend, you also have an audit log, which saves all actions.
Before 5.1.0 you could use HTTP calls to mimic frontend behavior to trigger some actions on the backend side.
Your test probably looked like this:
– call the http endpoint to search for a user
– check search event was saved to the database
– compare found user with the search event saved in the database
This test checks 100% of backend functionality. But most likely, the front end is also part of your system! So proper end-to-end (e2e) tests should start with a frontend application and end in a backend.
You could have false-positive results in e2e tests without touching the front end. F.e.: a user has some special symbols in his name. All backend tests pass, and you deploy your application in production. However, after the deployment, your users complain that the frontend part of the application crashes. The reason is – the front end can’t handle the backend’s response when rendering user details with special symbols in his name.
You can include the front end in your test with the new Catcher’s version. So – instead of calling HTTP, you can use the selenium step.
The test
Let’s write a test to search for a user and check that our search attempt was logged.
Every test starts with variables. We must create multiple users to cover false-positive results and check that only the correct one is returned. Let’s compose our users. Thanks to a random built-in function, every user will have a random email and name.
variables:
users:
- name: '{{ random("name") }}'
email: '{{ random("email") }}'
- name: '{{ random("name") }}'
email: '{{ random("email") }}'
- name: '{{ random("name") }}'
email: '{{ random("email") }}'Code language: JavaScript (javascript)Now we are ready to write our steps.
Populate the data
The first step we need to do is to populate the data with prepare step.
Let’s prepare a users.sql that will create all backend tables (in the case of the clean run, we don’t have them).
CREATE TABLE if not exists users_table(
                     email varchar(36) primary key,
                     name varchar(36) NOT NULL
);Code language: SQL (Structured Query Language) (sql)
Next – we need to fill our table with test data. users.csv will use our users variable to prepare data for our step.
email,name
{%- for user in users -%}
{{ user.email }},{{ user.name }}
{%- endfor -%}Code language: PHP (php)
The step itself will take users.sql and create database tables if needed. Then it will populate it using users.csv based on users variable.
steps:
  - prepare:
      populate:
          postgres:
              conf: '{{ postgres }}'
              schema: users_table.sql
              data:
                  users: users.csv
      name: Populate postgres with {{ users|length }} usersCode language: JavaScript (javascript)
Select a user to search for
The next (small) step is to select a user for our search. The Echo step will randomly select user from users variable and register its email as a new variable.
- echo:
    from: '{{ random_choice(users).email }}'
    register: {search_for: '{{ OUTPUT }}'}
    name: 'Select {{ search_for }} for search'Code language: JavaScript (javascript)
Search frontend for our user
With the Selenium step, we can use our front end to search for the user. Selenium step runs the JS/Java/Jar/Python script from the resources directory.
It passes Catcher’s variables as environment variables to the script so you can access it within Selenium. It also sees the script’s output, so you can access everything in Catcher’s next steps.
- selenium:
        test:
            file: register_user.js
            driver: '/usr/lib/geckodriver'
        register: {title: '{{ OUTPUT.title  }}'}Code language: JavaScript (javascript)
The script will run register_user, which searches for our selected user and will register the page’s title.
Check the search log
After the search, we needed to check if the request was logged. Imagine our backend uses MongoDB. So we’ll use mongo step.
- mongo:
      request:
            conf: '{{ mongo }}'
            collection: 'search_log'
            find: {'text': '{{ search_for }}'}
      register: {search_log: '{{ OUTPUT }}'}Code language: JavaScript (javascript)
This step searches the MongoDB search_log collection for any search attempts with our user in text.
Compare results
The final two steps are the comparison of the results. First – we’ll use echo again to transform our users so that we can search for users by email.
- echo:
        from: '{{ users|groupby("email")|asdict }}'
        register: {users_kv: '{{ OUTPUT }}'}Code language: JavaScript (javascript)
Second – we will compare frontend page title got from selenium with the MongoDB search log and the user’s name.
 - check:
        and:
            - equals: {the: '{{ users_kv[search_for][0].name }}', is: '{{ title }}'}
            - equals: {the: '{{ title }}', is: '{{ search_log.name }}'}Code language: CSS (css)
The selenium resource
Let’s add a Selenium test resource. It will go to your site and will search for your user. If everything is OK page title will be the result of this step.
Javascript
Selenium step supports Java, JS, Python, and Jar archives. In this article, I’ll show you all of them (except Jar, it is the same as Java but without compilation). Let’s start with JavaScript.
const {Builder, By, Key, until} = require('selenium-webdriver');
async function basicExample(){
    let driver = await new Builder().forBrowser('firefox').build();
    try{
        await driver.get(process.env.site_url);
        await driver.findElement(By.name('q')).sendKeys(process.env.search_for, Key.RETURN);
        await driver.wait(until.titleContains(process.env.search_for), 1000);
        await driver.getTitle().then(function(title) {
                    console.log('{\"title\":\"' + title + '\"}')
            });
        driver.quit();
    }
    catch(err) {
        console.error(err);
        process.exitCode = 1;
        driver.quit();
      }
}
basicExample();Code language: JavaScript (javascript)
Catcher:
- passes all its variables as environment variables, so you can access them from JS/Java/Python. (
process.env.site_urlin this example) - takes site_url from Catcher’s variables and
process.env.search_for - takes user’s email to search for it.
Catcher catches everything you write to STDOUT. In the case of JSON, it will be returned as a dictionary. F.e. with console.log('{\"title\":\"' + title + '\"}') statement OUTPUT.title will be available on Catcher’s side. If Catcher can’t parse JSON – it will return a text as OUTPUT.
Python
Here is the Python implementation of the same resource. It should also be placed in resources the directory. To use it instead of Java implementation, you need to change file parameters in the Selenium step.
from selenium import webdriver
from selenium.webdriver.common.keys import Keys
import os
from selenium.webdriver.firefox.options import Options

options = Options()
options.headless = True
driver = webdriver.Firefox(options=options)
try:
    driver.get(os.environ['site_url'])
    assert "Python" in driver.title
    elem = driver.find_element_by_name("q")
    elem.clear()
    elem.send_keys(os.environ['search_for'])
    elem.send_keys(Keys.RETURN)
    assert "No results found." not in driver.page_source
    print(f'{"title":"{driver.title}"')
finally:
    driver.close() Code language: Python (python)
Java
Java is a bit more complex, as (if you are not using already compiled Jar) Catcher should compile Java source before running it. To do this, you must install Java and Selenium libraries in your system.
Luckily Catcher comes with a Docker image with libraries (JS, Java, Python), Selenium drivers (Firefox, Chrome, Opera), and tools (NodeJS, JDK, Python) installed.
package selenium;

import org.openqa.selenium.By;
import org.openqa.selenium.WebDriver;
import org.openqa.selenium.WebElement;
import org.openqa.selenium.firefox.FirefoxDriver;
import org.openqa.selenium.firefox.FirefoxBinary;
import org.openqa.selenium.firefox.FirefoxOptions;

public class MySeleniumTest {

    public static void main(String[] args) {
        FirefoxBinary firefoxBinary = new FirefoxBinary();
        FirefoxOptions options = new FirefoxOptions();
        options.setBinary(firefoxBinary);
        options.setHeadless(true);
        WebDriver driver = new FirefoxDriver(options);
        try {
            driver.get(System.getenv("site_url"));
            WebElement element = driver.findElement(By.name("q"));
            element.sendKeys(System.getenv("search_for"));
            element.submit();
            System.out.println("{\"title\":\""+driver.getTitle() + "\"}");
        } finally {
            driver.quit();
        }
    }
} Code language: Java (java)
Conclusion
Catcher’s update 5.1.0 unites front and backend testing, allowing them both to exist in one test case. It improves the coverage and makes the test truly end-to-end.